| |
|
Any logo = HOME
All items stocked
|
Guillen's Enterprises, Inc.
Your place for:
FLUSHMATE®
GENUINE PARTS
|
-
Buy Online
Now!
-
Same Day
Shipping!
-
No
Minimum
-
We Ship
Anywhere
|
|
Warning:
Sloan Flushmate Systems do not retrofit the standard gravity fed
toilets
INTELLI-Flush™ *
Not intended
for use on 200, 500, 501 or 501-A series FLUSHMATE® or any series
using a tank lid pushbutton This product is not designed to
be used on any flushing system other than FLUSHMATE® |
|
INTELLI-Flush™
Automatic Flushing System
the first battery-operated
retrofit
kit
for
existing
FLUSHMATE® water closets!
|
|
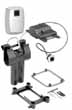
Easy to install on-wall or in-wall sensor system |
|
 |
buy online On-Wall
Sensor Models |
|
K-100100
INTELLI-Flush™
Automatic Flushing System. On-Wall Sensor, with white trim
* |
|
K-100101
INTELLI-Flush™
Automatic Flushing System. On-Wall Sensor, with chrome trim
* |
|
 |
buy online In-Wall
Sensor Models |
|
K-100102
INTELLI-Flush™
Automatic Flushing System. In-Wall Sensor, with white trim
* |
|
K-100103
INTELLI-Flush™
Automatic Flushing System. In-Wall Sensor, with chrome trim * |
|
K-100500
INTELLI-Flush™
Automatic Flushing System. with override button, no sensor
* |
|
|
INSTALLATION HELP
PAGE 1 of 2
NEXT TO
PAGE 2 >>
Quick and
Easy Installation INTELLI-Flush™ is
ready to install on the following series*: |
|
|
 |
|
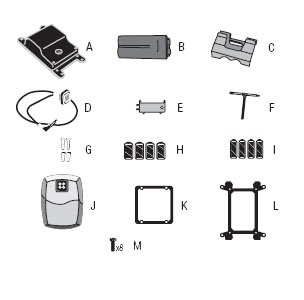
COMPONENTS
Tools
Required: Philips and slotted screwdriver, pliers, ruler and
1-3/4" hole saw for In-Wall |
|
A) Flush
Module
B) Battery Pack
C) Battery Holder
D) Over-Ride Button
E) Cover Key
F) T-Wrench/Depth Gauge/
Sensor Tool
G) Screws & Anchors (2)
H) C-cell Alkaline Batteries (4)
I) AA-cell Alkaline Batteries (4)
J) On-Wall Sensor
K) In-Wall Sensor
L) Adapter 504
M) Adapter 501-B
N) Mounting Screws (8)
|
|
|
The Sensor
and Flush Module contained within this kit have been
programmed to work together and should not be switched with
similar components from other kits. |
|
STEP #1 |
|
|
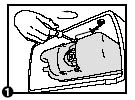
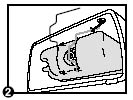
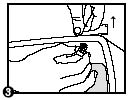
1) Remove
retainer clips, (image 1), flush rod, (image 2), and handle,
(image 3). (Note: reverse threads on handle.) |
|
   |
|
STEP #2 |
|
|
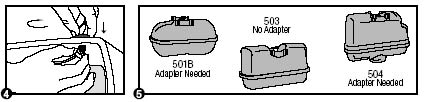
1) Install
Over-Ride Button (D), (image 4). Identify appropriate
Adapter (L or M) if needed, (image 5). |
|
 |
|
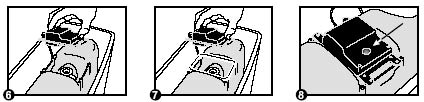
2) Place
Flush Module (A) in position over Actuator (image 6).
(Actuator is the centered white disk with Philip screw in
center.) If using Adapter, (image 7) note the positioning of
the Flush Module (A) wire, (image 6 & 7). |
|
 |
|
3) Insert
T-wrench/Depth Gauge/Sensor tool (F) in hole of Flush Module
(A), (image 8). Adjust Actuator by loosening set screw and
turning Actuator to proper height according to depth gauge,
so that yellow ring on depth gauge aligns with top of Flush
Module (A), (image 9). Tighten set screw on Actuator. |
|
 |
|
STEP #3 |
|
|
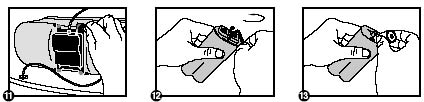
1) Plug
Over-Ride Button (D) wire into Flush Module (A), (image 11) |
|
 |
|
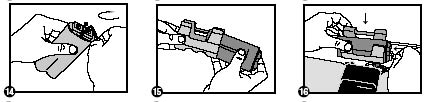
2) Remove
cover on Battery Pack (B), (image 12). Install batteries,
(image 13), noting the battery polarity (+/-) printed on
pack. Reinstall cover on Battery Pack (B), (image 14). Place
Battery Pack (B) in Battery Holder (C), (image 15). Hang
Battery Holder (C) on top edge of china tank and connect the
Flush Module (A) wire into the Battery Pack (B). Slide
rubber boot over connection, (image 16). (Using the Battery
Holder (C) is optional. If there is ample space, you can
place it anywhere in the tank as long as the wire is not
being stretched.) |
|
 |
|
NEXT TO
PAGE 2 >>
|
*Not intended
for use on 200, 500, 501 or 501-A series FLUSHMATE® or any series
using a pushbutton on the tank lid. This product is not designed to
be used on any flushing system other than FLUSHMATE®
|
|
Warning: Sloan Flushmate Systems do not retrofit the standard
gravity fed toilets |
| |
|
|
|
|
|
|
|
|